
再详细阅读源码之前先来看张图,介绍下spring-session中的核心模块以及之间的交互。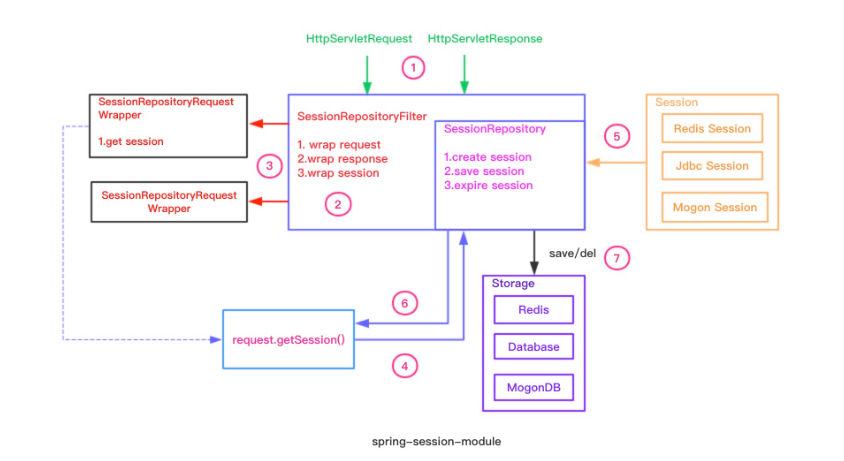
spring-session分为以下核心模块:
- SessionRepositoryFilter:Servlet规范中Filter的实现,用来切换HttpSession至Spring Session,包装HttpServletRequest和HttpServletResponse
- HttpServerletRequest/HttpServletResponse/HttpSessionWrapper包装器:包装原有的HttpServletRequest、HttpServletResponse和Spring Session,实现切换Session和透明继承HttpSession的关键之所在
- Session:Spring Session模块
- SessionRepository:管理Spring Session的模块
- HttpSessionStrategy:映射HttpRequst和HttpResponse到Session的策略
1. SessionRepositoryFilter
SessionRepositoryFilter是一个Filter过滤器,符合Servlet的规范定义,用来修改包装请求和响应。这里负责包装切换HttpSession至Spring Session的请求和响应。
SpringHttpSessionConfiguration 类定义SessionRepositoryFilter Bean,而在spring项目DelegatingFilterProxy代理装配SessionRepositoryFilter可参考spring 引入 session代码,
而spring boot项目为何自动装配SessionRepositoryFilter 待补充)1
2
3
4
5
6
7
8
9
10
11
12
13
14
15
16
17
18
19
20
21
22
23
24
25
26@Override
protected void doFilterInternal(HttpServletRequest request,
HttpServletResponse response, FilterChain filterChain)
throws ServletException, IOException {
// 设置SessionRepository至Request的属性中
request.setAttribute(SESSION_REPOSITORY_ATTR, this.sessionRepository);
// 包装原始HttpServletRequest至SessionRepositoryRequestWrapper
SessionRepositoryRequestWrapper wrappedRequest = new SessionRepositoryRequestWrapper(
request, response, this.servletContext);
// 包装原始HttpServletResponse响应至SessionRepositoryResponseWrapper
SessionRepositoryResponseWrapper wrappedResponse = new SessionRepositoryResponseWrapper(
wrappedRequest, response);
// 设置当前请求的HttpSessionStrategy策略
HttpServletRequest strategyRequest = this.httpSessionStrategy
.wrapRequest(wrappedRequest, wrappedResponse);
// 设置当前响应的HttpSessionStrategy策略
HttpServletResponse strategyResponse = this.httpSessionStrategy
.wrapResponse(wrappedRequest, wrappedResponse);
try {
filterChain.doFilter(strategyRequest, strategyResponse);
}
finally {
// 提交session
wrappedRequest.commitSession();
}
}
以上是SessionRepositoryFilter的核心操作,每个HttpRequest进入,都会被该Filter包装成切换Session的请求很响应对象。
SessionRepositoryRequestWrapper
对于developers获取HttpSession的api1
2HttpServletRequest request = ...;
HttpSession session = request.getSession(true);
在spring session中request的实际类型SessionRepositoryRequestWrapper。调用SessionRepositoryRequestWrapper的getSession方法会触发创建spring session,而非web容器的HttpSession。
SessionRepositoryRequestWrapper用来包装原始的HttpServletRequest实现HttpSession切换至Spring Session。是透明Spring Session透明集成HttpSession的关键。1
2
3
4
5
6
7
8
9
10
11
12
13
14
15
16
17
18
19
20
21private final class SessionRepositoryRequestWrapper
extends HttpServletRequestWrapper {
private final String CURRENT_SESSION_ATTR = HttpServletRequestWrapper.class
.getName();
// 当前请求sessionId有效
private Boolean requestedSessionIdValid;
// 当前请求sessionId无效
private boolean requestedSessionInvalidated;
private final HttpServletResponse response;
private final ServletContext servletContext;
private SessionRepositoryRequestWrapper(HttpServletRequest request,
HttpServletResponse response, ServletContext servletContext) {
// 调用HttpServletRequestWrapper构造方法,实现包装
super(request);
this.response = response;
this.servletContext = servletContext;
}
}
SessionRepositoryRequestWrapper继承Servlet规范中定义的包装器HttpServletRequestWrapper。HttpServletRequestWrapper是Servlet规范api提供的用于扩展HttpServletRequest的扩张点——即装饰器模式,可以通过重写一些api达到功能点的增强和自定义。
HttpServletRequestWrapper中持有一个HttpServletRequest对象,然后实现HttpServletRequest接口的所有方法,所有方法实现中都是调用持有的HttpServletRequest对象的相应的方法。继承HttpServletRequestWrapper 可以对其重写。SessionRepositoryRequestWrapper继承HttpServletRequestWrapper,在构造方法中将原有的HttpServletRequest通过调用super完成对HttpServletRequestWrapper中持有的HttpServletRequest初始化赋值,然后重写和session相关的方法。这样就保证SessionRepositoryRequestWrapper的其他方法调用都是使用原有的HttpServletRequest的数据,只有session相关的是重写的逻辑。
这里的设计是否很精妙!一切都多亏与Servlet规范设计的的巧妙啊!1
2
3
4@Override
public HttpSessionWrapper getSession() {
return getSession(true);
}
重写HttpServletRequest的getSession()方法,调用有参数getSession(arg)方法,默认为true,表示当前reques没有session时创建session。继续看下有参数getSession(arg)的重写逻辑.1
2
3
4
5
6
7
8
9
10
11
12
13
14
15
16
17
18
19
20
21
22
23
24
25
26
27
28
29
30
31
32
33
34
35
36
37
38
39
40
41
42
43
44
45
46
47
48
49
50
51
52
53
54
55
56
57
58
59@Override
public HttpSessionWrapper getSession(boolean create) {
// 从当前请求的attribute中获取session,如果有直接返回
HttpSessionWrapper currentSession = getCurrentSession();
if (currentSession != null) {
return currentSession;
}
// 获取当前request的sessionId,这里使用了HttpSessionStrategy
// 决定怎样将Request映射至Session,默认使用Cookie策略,即从cookies中解析sessionId
String requestedSessionId = getRequestedSessionId();
// 请求的如果sessionId存在且当前request的attribute中的没有session失效属性
// 则根据sessionId获取spring session
if (requestedSessionId != null
&& getAttribute(INVALID_SESSION_ID_ATTR) == null) {
S session = getSession(requestedSessionId);
// 如果spring session不为空,则将spring session包装成HttpSession并
// 设置到当前Request的attribute中,防止同一个request getsession时频繁的到存储器
//中获取session,提高性能
if (session != null) {
this.requestedSessionIdValid = true;
currentSession = new HttpSessionWrapper(session, getServletContext());
currentSession.setNew(false);
setCurrentSession(currentSession);
return currentSession;
}
// 如果根据sessionId,没有获取到session,则设置当前request属性,此sessionId无效
// 同一个请求中获取session,直接返回无效
else {
// This is an invalid session id. No need to ask again if
// request.getSession is invoked for the duration of this request
if (SESSION_LOGGER.isDebugEnabled()) {
SESSION_LOGGER.debug(
"No session found by id: Caching result for getSession(false) for this HttpServletRequest.");
}
setAttribute(INVALID_SESSION_ID_ATTR, "true");
}
}
// 判断是否创建session
if (!create) {
return null;
}
if (SESSION_LOGGER.isDebugEnabled()) {
SESSION_LOGGER.debug(
"A new session was created. To help you troubleshoot where the session was created we provided a StackTrace (this is not an error). You can prevent this from appearing by disabling DEBUG logging for "
+ SESSION_LOGGER_NAME,
new RuntimeException(
"For debugging purposes only (not an error)"));
}
// 根据sessionRepository创建spring session
S session = SessionRepositoryFilter.this.sessionRepository.createSession();
// 设置session的最新访问时间
session.setLastAccessedTime(System.currentTimeMillis());
// 包装成HttpSession透明化集成
currentSession = new HttpSessionWrapper(session, getServletContext());
// 设置session至Requset的attribute中,提高同一个request访问session的性能
setCurrentSession(currentSession);
return currentSession;
}
再来看下spring session的持久化。上述SessionRepositoryFilter在包装HttpServletRequest后,执行FilterChain中使用finally保证请求的Session始终session会被提交,此提交操作中将sesionId设置到response的head中并将session持久化至存储器中。
持久化只持久spring session,并不是将spring session包装后的HttpSession持久化,因为HttpSession不过是包装器,持久化没有意义。
再来看下包装的响应SessionRepositoryResponseWrapper。
SessionRepositoryResponseWrapper
1 | /** |
上面的注释已经非常详细,这里不再赘述。这里只讲述为什么需要包装原始的响应。从注释上可以看出包装响应时为了:确保如果响应被提交session能够被保存。
这里我有点疑惑:在上述的SessionRepositoryFilter.doFilterInternal方法中不是已经request.commitSession()了吗,FilterChain执行完或者异常后都会执行Finally中的request.commitSession。为什么这里仍然需要包装响应,为了确保session能够保存,包装器中的onResponseCommitted方法可以看出也是做了一次request.commitSession()
原因:一旦response执行flushBuffer方法,迫使Response中在Buffer中任何数据都会被返回至client端。这个方法自动提交响应中的status code和head。那么如果不包装请求,监听flushBuffer事件在提交response前,将session写入response和持久化session,将导致作者说的无法追踪session。(来源网上)
SessionRepositoryResponseWrapper继承父类OnCommittedResponseWrapper,其中flushBuffer方法如下:1
2
3
4
5
6
7
8
9
10
11
12
13
14
15
16
17
18
19
20
21
22/**
* Makes sure {@link OnCommittedResponseWrapper#onResponseCommitted()} is invoked
* before calling the superclass <code>flushBuffer()</code>.
* @throws IOException if an input or output exception occurred
*/
@Override
public void flushBuffer() throws IOException {
doOnResponseCommitted();
super.flushBuffer();
}
/**
* Calls <code>onResponseCommmitted()</code> with the current contents as long as
* {@link #disableOnResponseCommitted()} was not invoked.
*/
private void doOnResponseCommitted() {
if (!this.disableOnCommitted) {
onResponseCommitted();
disableOnResponseCommitted();
}
}
重写HttpServletResponse方法,监听response commit,当发生response commit时,可以在commit之前写session至response中并持久化session
再看SessionRepository之前,先来看下spring session中的session接口。
Session接口
spring-session和tomcat中的Session的实现模式上有很大不同,tomcat中直接对HttpSession接口进行实现,而spring-session中则抽象出单独的Session层接口,让后再使用适配器模式将Session适配层Servlet规范中的HttpSession。spring-sesion中关于session的实现和适配整个UML类图如下:
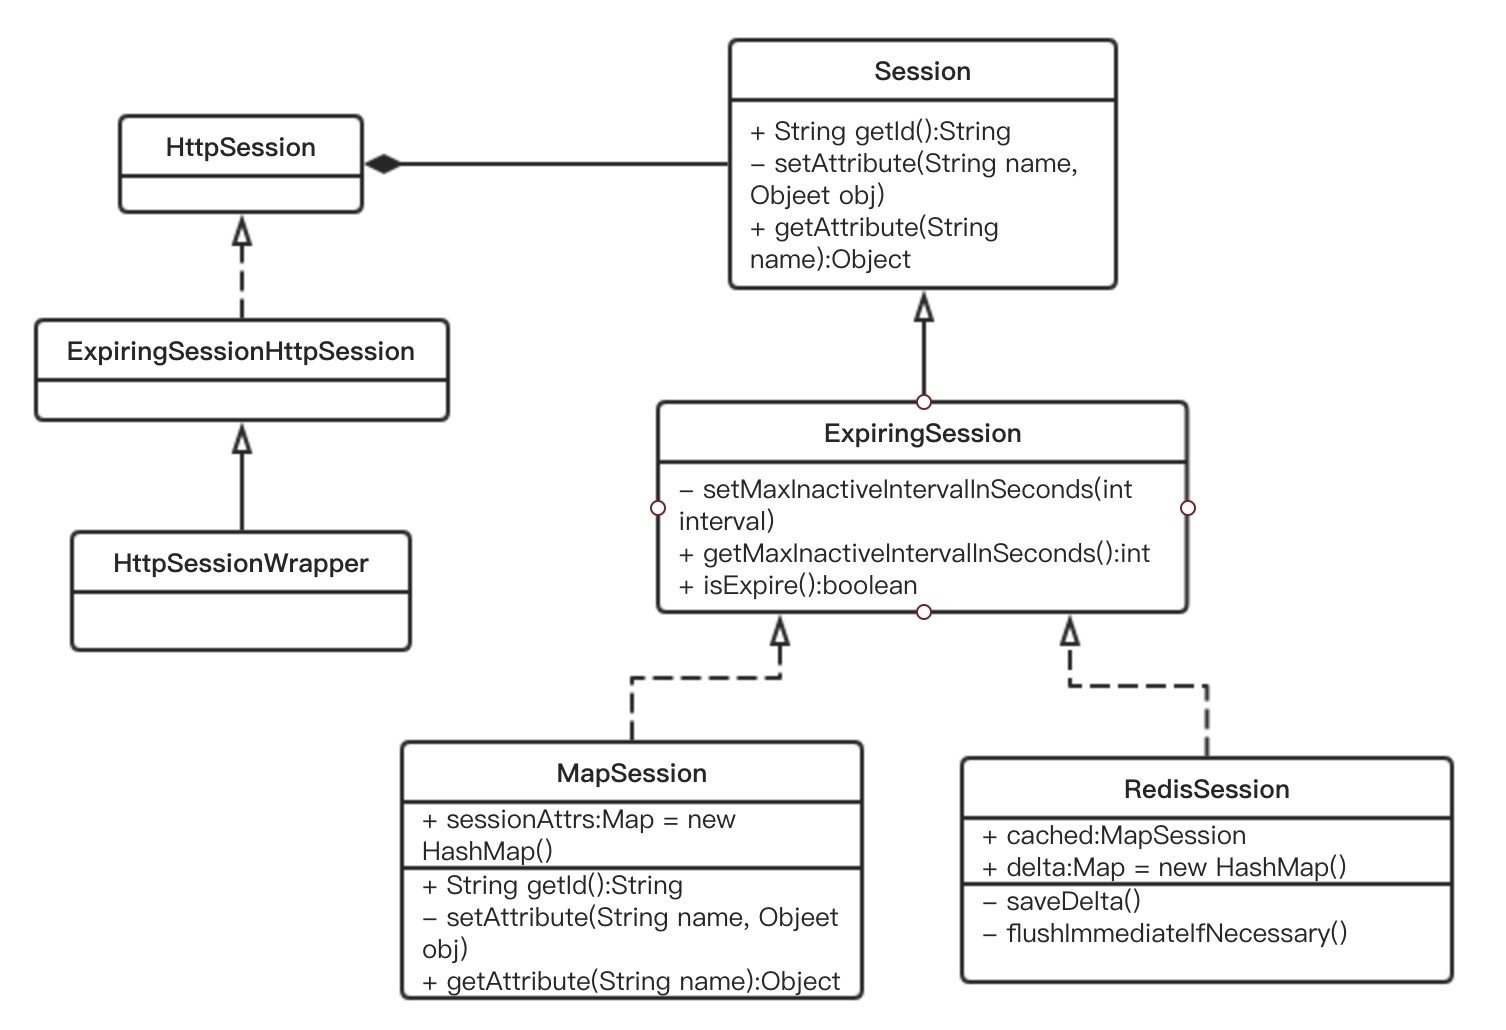
Session是spring-session对session的抽象,主要是为了鉴定用户,为Http请求和响应提供上下文过程,该Session可以被HttpSession、WebSocket Session,非WebSession等使用。定义了Session的基本行为:
- getId:获取sessionId
- setAttribute:设置session属性
- getAttribte:获取session属性
ExipringSession:提供Session额外的过期特性。定义了以下关于过期的行为:
- setLastAccessedTime:设置最近Session会话过程中最近的访问时间
- getLastAccessedTime:获取最近的访问时间
- setMaxInactiveIntervalInSeconds:设置Session的最大闲置时间
- getMaxInactiveIntervalInSeconds:获取最大闲置时间
- isExpired:判断Session是否过期
MapSession:基于java.util.Map的ExpiringSession的实现
RedisSession:基于MapSession和Redis的ExpiringSession实现,提供Session的持久化能力
先来看下MapSession的代码源码片段1
2
3
4
5
6
7
8
9
10
11
12
13
14
15public final class MapSession implements ExpiringSession, Serializable {
/**
* Default {@link #setMaxInactiveIntervalInSeconds(int)} (30 minutes).
*/
public static final int DEFAULT_MAX_INACTIVE_INTERVAL_SECONDS = 1800;
private String id;
private Map<String, Object> sessionAttrs = new HashMap<String, Object>();
private long creationTime = System.currentTimeMillis();
private long lastAccessedTime = this.creationTime;
/**
* Defaults to 30 minutes.
*/
private int maxInactiveInterval = DEFAULT_MAX_INACTIVE_INTERVAL_SECONDS;
MapSession中持有HashMap类型的变量sessionAtts用于存储Session设置属性,比如调用的setAttribute方法的k-v就存储在该HashMap中。这个和tomcat内部实现HttpSession的方式类似,tomcat中使用了ConcurrentHashMap存储。
其中lastAccessedTime用于记录最近的一次访问时间,maxInactiveInterval用于记录Session的最大闲置时间(过期时间-针对没有Request活跃的情况下的最大时间,即相对于最近一次访问后的最大闲置时间)。1
2
3
4
5
6
7
8public void setAttribute(String attributeName, Object attributeValue) {
if (attributeValue == null) {
removeAttribute(attributeName);
}
else {
this.sessionAttrs.put(attributeName, attributeValue);
}
}
setAttribute方法极其简单,null时就移除attributeName,否则put存储。
重点熟悉RedisSession如何实现Session的行为:setAttribute、persistence等。1
2
3
4
5
6
7
8
9
10
11
12
13
14
15/**
* A custom implementation of {@link Session} that uses a {@link MapSession} as the
* basis for its mapping. It keeps track of any attributes that have changed. When
* {@link org.springframework.session.data.redis.RedisOperationsSessionRepository.RedisSession#saveDelta()}
* is invoked all the attributes that have been changed will be persisted.
*
* @author Rob Winch
* @since 1.0
*/
final class RedisSession implements ExpiringSession {
private final MapSession cached;
private Long originalLastAccessTime;
private Map<String, Object> delta = new HashMap<String, Object>();
private boolean isNew;
private String originalPrincipalName;
首先看javadocs,对于阅读源码,学会看javadocs非常重要!
基于MapSession的基本映射实现的Session,能够追踪发生变化的所有属性,当调用saveDelta方法后,变化的属性将被持久化!
在RedisSession中有两个非常重要的成员属性:
- cached:实际上是一个MapSession实例,用于做本地缓存,每次在getAttribute时无需从Redis中获取,主要为了improve性能
- delta:用于跟踪变化数据,做持久化
再来看下RedisSession中最为重要的行为saveDelta——持久化Session至Redis中:1
2
3
4
5
6
7
8
9
10
11
12
13
14
15
16
17
18
19
20
21
22
23
24
25
26
27
28
29
30
31
32
33
34
35
36
37
38
39
40
41
42
43/**
* Saves any attributes that have been changed and updates the expiration of this
* session.
*/
private void saveDelta() {
// 如果delta为空,则Session中没有任何数据需要存储
if (this.delta.isEmpty()) {
return;
}
String sessionId = getId();
// 使用spring data redis将delta中的数据保存至Redis中
getSessionBoundHashOperations(sessionId).putAll(this.delta);
String principalSessionKey = getSessionAttrNameKey(
FindByIndexNameSessionRepository.PRINCIPAL_NAME_INDEX_NAME);
String securityPrincipalSessionKey = getSessionAttrNameKey(
SPRING_SECURITY_CONTEXT);
if (this.delta.containsKey(principalSessionKey)
|| this.delta.containsKey(securityPrincipalSessionKey)) {
if (this.originalPrincipalName != null) {
String originalPrincipalRedisKey = getPrincipalKey(
this.originalPrincipalName);
RedisOperationsSessionRepository.this.sessionRedisOperations
.boundSetOps(originalPrincipalRedisKey).remove(sessionId);
}
String principal = PRINCIPAL_NAME_RESOLVER.resolvePrincipal(this);
this.originalPrincipalName = principal;
if (principal != null) {
String principalRedisKey = getPrincipalKey(principal);
RedisOperationsSessionRepository.this.sessionRedisOperations
.boundSetOps(principalRedisKey).add(sessionId);
}
}
// 清空delta,代表没有任何需要持久化的数据。同时保证
//SessionRepositoryFilter和SessionRepositoryResponseWrapper的onResponseCommitted
//只会持久化一次Session至Redis中,解决前面提到的疑问
this.delta = new HashMap<String, Object>(this.delta.size());
// 更新过期时间,滚动至下一个过期时间间隔的时刻
Long originalExpiration = this.originalLastAccessTime == null ? null
: this.originalLastAccessTime + TimeUnit.SECONDS
.toMillis(getMaxInactiveIntervalInSeconds());
RedisOperationsSessionRepository.this.expirationPolicy
.onExpirationUpdated(originalExpiration, this);
}
从javadoc中可以看出,saveDelta用于存储Session的属性:
- 保存Session中的属性数据至Redis中
- 清空delta中数据,防止重复提交Session中的数据
- 更新过期时间至下一个过期时间间隔的时刻
再看下RedisSession中的其他行为1
2
3
4
5
6
7
8
9
10
11
12
13
14
15
16
17
18
19
20
21
22
23
24// 设置session的存活时间,即最大过期时间。先保存至本地缓存,然后再保存至delta
public void setMaxInactiveIntervalInSeconds(int interval) {
this.cached.setMaxInactiveIntervalInSeconds(interval);
this.delta.put(MAX_INACTIVE_ATTR, getMaxInactiveIntervalInSeconds());
flushImmediateIfNecessary();
}
// 直接从本地缓存获取过期时间
public int getMaxInactiveIntervalInSeconds() {
return this.cached.getMaxInactiveIntervalInSeconds();
}
// 直接从本地缓存中获取Session中的属性
@SuppressWarnings("unchecked")
public Object getAttribute(String attributeName) {
return this.cached.getAttribute(attributeName);
}
// 保存Session属性至本地缓存和delta中
public void setAttribute(String attributeName, Object attributeValue) {
this.cached.setAttribute(attributeName, attributeValue);
this.delta.put(getSessionAttrNameKey(attributeName), attributeValue);
flushImmediateIfNecessary();
}
除了MapSession和RedisSession还有JdbcSession、MongoExpiringSession,感兴趣的读者可以自行阅读。
下面看SessionRepository的逻辑。SessionRepository是spring session中用于管理spring session的核心组件。
SessionRepository
javadoc中描述SessionRepository为管理spring-session的接口实例。抽象出:1
2
3
4S createSession();
void save(S session);
S getSession(String id);
void delete(String id);
创建、保存、获取、删除Session的接口行为。根据Session的不同,分为很多种Session操作仓库。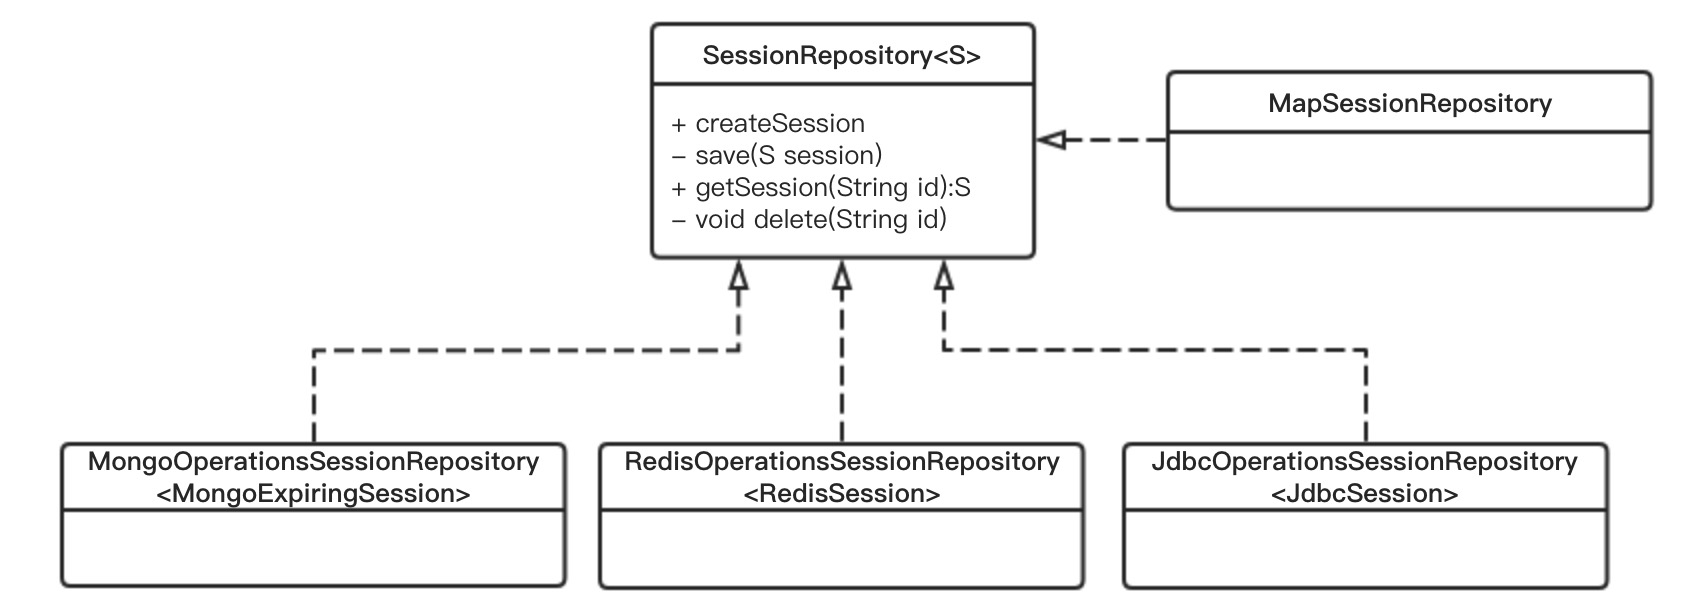
这里重点介绍下RedisOperationsSessionRepository。在详细介绍其之前,了解下RedisOperationsSessionRepository的数据存储细节。
当创建一个RedisSession,然后存储在Redis中时,RedisSession的存储细节如下:
spring:session:sessions:33fdd1b6-b496-4b33-9f7d-df96679d32fe
spring:session:sessions:expires:33fdd1b6-b496-4b33-9f7d-df96679d32fe
spring:session:expirations:1439245080000
Redis会为每个RedisSession存储三个k-v。
- 第一个k-v用来存储Session的详细信息,包括Session的过期时间间隔、最近的访问时间、attributes等等。这个k的过期时间为Session的最大过期时间 + 5分钟。如果默认的最大过期时间为30分钟,则这个k的过期时间为35分钟
- 第二个k-v用来表示Session在Redis中的过期,这个k-v不存储任何有用数据,只是表示Session过期而设置。这个k在Redis中的过期时间即为Session的过期时间间隔
- 第三个k-v存储这个Session的id,是一个Set类型的Redis数据结构。这个k中的最后的1439245080000值是一个时间戳,根据这个Session过期时刻滚动至下一分钟而计算得出。
简单描述下,为什么RedisSession的存储用到了三个Key,而非一个Redis过期Key。
对于Session的实现,需要支持HttpSessionEvent,即Session创建、过期、销毁等事件。当应用用监听器设置监听相应事件,Session发生上述行为时,监听器能够做出相应的处理。
Redis的强大之处在于支持KeySpace Notifiction——键空间通知。即可以监视某个key的变化,如删除、更新、过期。
但是Redis中带有过期的key有两种方式:
- 当访问时发现其过期
- Redis后台逐步查找过期键
当访问时发现其过期,会产生过期事件,但是无法保证key的过期时间抵达后立即生成过期事件。
spring-session为了能够及时的产生Session的过期时的过期事件,所以增加了:
spring:session:sessions:expires:33fdd1b6-b496-4b33-9f7d-df96679d32fe
spring:session:expirations:1439245080000
spring-session中有个定时任务,每个整分钟都会查询相应的spring:session:expirations:整分钟的时间戳中的过期SessionId,然后再访问一次这个SessionId,即spring:session:sessions:expires:SessionId,以便能够让Redis及时的产生key过期事件——即Session过期事件。
接下来再看下RedisOperationsSessionRepository中的具体实现原理
createSession方法:
1 | public RedisSession createSession() { |
再来看下RedisSession的构造方法:1
2
3
4
5
6
7
8
9
10
11
12
13
14
15
16/**
* Creates a new instance ensuring to mark all of the new attributes to be
* persisted in the next save operation.
*/
RedisSession() {
// 设置本地缓存为MapSession
this(new MapSession());
// 设置Session的基本属性
this.delta.put(CREATION_TIME_ATTR, getCreationTime());
this.delta.put(MAX_INACTIVE_ATTR, getMaxInactiveIntervalInSeconds());
this.delta.put(LAST_ACCESSED_ATTR, getLastAccessedTime());
// 标记Session的是否为新创建
this.isNew = true;
// 持久化
flushImmediateIfNecessary();
}
save方法:
1 | public void save(RedisSession session) { |
getSession方法:
1 | // 根据SessionId获取Session,这里的false代表的参数 |
在有些情况下,Session过期,仍然需要能够获取到Session。这里先来看下getSession(String id, boolean allowExpired):1
2
3
4
5
6
7
8
9
10
11
12
13
14
15
16
17
18
19
20
private RedisSession getSession(String id, boolean allowExpired) {
    // 根据SessionId,从Redis获取到持久化的Session信息
    Map<Object, Object> entries = getSessionBoundHashOperations(id).entries();
    // 如果Redis中没有,则返回null
    if (entries.isEmpty()) {
        return null;
    }
    // 根据Session信息,加载创建一个MapSession对象
    MapSession loaded = loadSession(id, entries);
    //  判断是否允许过期获取和Session是否过期
    if (!allowExpired && loaded.isExpired()) {
        return null;
    }
    // 根据MapSession new一个信息的RedisSession,此时isNew为false
    RedisSession result = new RedisSession(loaded);
    // 设置最新的访问时间
    result.originalLastAccessTime = loaded.getLastAccessedTime();
    return result;
}
这里需要注意的是loaded.isExpired()和loadSession。loaded.isExpired判断Session是否过期,如果过期返回null:1
2
3
4
5
6
7
8
9
10
11
12
13
14
15
16public boolean isExpired() {
// 根据当前时间判断是否过期
return isExpired(System.currentTimeMillis());
}
boolean isExpired(long now) {
// 如果maxInactiveInterval小于0,表示Session永不过期
if (this.maxInactiveInterval < 0) {
return false;
}
// 最大过期时间单位转换为毫秒
// 当前时间减去Session的最大有效期间隔以获取理论上有效的上一次访问时间
// 然后在与实际的上一次访问时间进行比较
// 如果大于,表示理论上的时间已经在实际的访问时间之后,那么表示Session已经过期
return now - TimeUnit.SECONDS
.toMillis(this.maxInactiveInterval) >= this.lastAccessedTime;
}
loadSession中,将Redis中存储的Session信息转换为MapSession对象,以便从Session中获取属性时能够从内存直接获取提高性能:1
2
3
4
5
6
7
8
9
10
11
12
13
14
15
16
17
18
19
20private MapSession loadSession(String id, Map<Object, Object> entries) {
MapSession loaded = new MapSession(id);
for (Map.Entry<Object, Object> entry : entries.entrySet()) {
String key = (String) entry.getKey();
if (CREATION_TIME_ATTR.equals(key)) {
loaded.setCreationTime((Long) entry.getValue());
}
else if (MAX_INACTIVE_ATTR.equals(key)) {
loaded.setMaxInactiveIntervalInSeconds((Integer) entry.getValue());
}
else if (LAST_ACCESSED_ATTR.equals(key)) {
loaded.setLastAccessedTime((Long) entry.getValue());
}
else if (key.startsWith(SESSION_ATTR_PREFIX)) {
loaded.setAttribute(key.substring(SESSION_ATTR_PREFIX.length()),
entry.getValue());
}
}
return loaded;
}
至此,可以看出spring-session中request.getSession(false)的过期实现原理。
delete方法:
1 | public void delete(String sessionId) { |
至此RedisOperationsSessionRepository的核心原理就介绍完毕。但是RedisOperationsSessionRepository中还包括关于Session事件的处理和清理Session的定时任务。这部分内容在后述的SessionEvent部分介绍。
HttpSessionStrategy
从javadoc中可以看出,HttpSessionStrategy是建立Request/Response和Session之间的映射关系的策略。
该策略接口中定义一套策略行为:1
2
3
4
5
6
7// 根据请求获取SessionId,即建立请求至Session的映射关系
String getRequestedSessionId(HttpServletRequest request);
// 对于新创建的Session,通知客户端
void onNewSession(Session session, HttpServletRequest request,
HttpServletResponse response);
// 对于session无效,通知客户端
void onInvalidateSession(HttpServletRequest request, HttpServletResponse response);
如下UML类图: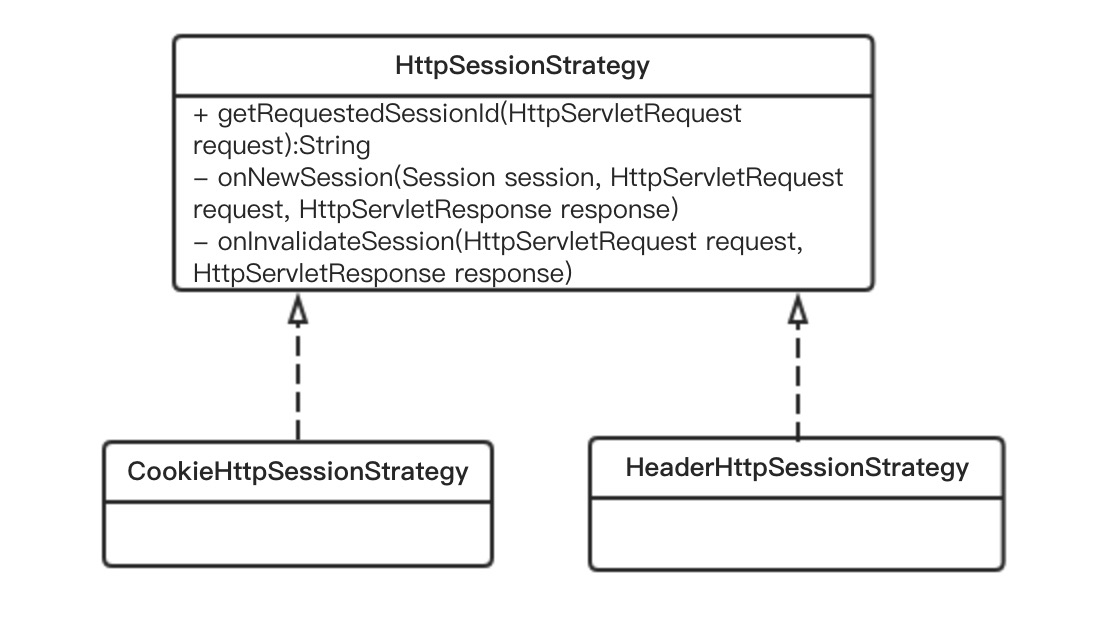
这里主要介绍CookieHttpSessionStrategy,这个也是默认的策略,可以查看spring-session中类SpringHttpSessionConfiguration,在注册SessionRepositoryFilter Bean时默认采用CookieHttpSessionStrategy:1
2
3
4
5
6
7
8
9
10
11
12
13
14
15@Bean
public <S extends ExpiringSession> SessionRepositoryFilter<? extends ExpiringSession> springSessionRepositoryFilter(
SessionRepository<S> sessionRepository) {
SessionRepositoryFilter<S> sessionRepositoryFilter = new SessionRepositoryFilter<S>(
sessionRepository);
sessionRepositoryFilter.setServletContext(this.servletContext);
if (this.httpSessionStrategy instanceof MultiHttpSessionStrategy) {
sessionRepositoryFilter.setHttpSessionStrategy(
(MultiHttpSessionStrategy) this.httpSessionStrategy);
}
else {
sessionRepositoryFilter.setHttpSessionStrategy(this.httpSessionStrategy);
}
return sessionRepositoryFilter;
}
下面来分析CookieHttpSessionStrategy的原理。该策略使用Cookie来映射Request/Response至Session。即request/requset的head中cookie存储SessionId,当请求至web服务器,可以解析请求head中的cookie,然后获取sessionId,根据sessionId获取spring-session。当创建新的session或者session过期,将相应的sessionId写入response的set-cookie或者从respose中移除sessionId。
getRequestedSessionId方法
1 | public String getRequestedSessionId(HttpServletRequest request) { |
接下来看下具体获取SessionIds的具体过程:1
2
3
4
5
6
7
8
9
10
11
12
13
14
15
16
17
18
19
20
21
22
23
24
25
26
27
28
29
30
31
32
33
34
35
36
37
38
39
40
41
42
43
44
45
46
47
48
49
50
51
52
53
54
55
56
57
58
59
60
61
62public String getRequestedSessionId(HttpServletRequest request) {
// 获取当前请求的sessionId:session别名和sessionId映射
Map<String, String> sessionIds = getSessionIds(request);
// 获取当前请求的Session别名
String sessionAlias = getCurrentSessionAlias(request);
// 获取相应别名的sessionId
return sessionIds.get(sessionAlias);
}
public Map<String, String> getSessionIds(HttpServletRequest request) {
// 解析request中的cookie值
List<String> cookieValues = this.cookieSerializer.readCookieValues(request);
// 获取sessionId
String sessionCookieValue = cookieValues.isEmpty() ? ""
: cookieValues.iterator().next();
Map<String, String> result = new LinkedHashMap<String, String>();
// 根据分词器对sessionId进行分割,因为spring-session支持多session。默认情况只有一个session
StringTokenizer tokens = new StringTokenizer(sessionCookieValue, this.deserializationDelimiter);
// 如果只有一个session,则设置默认别名为0
if (tokens.countTokens() == 1) {
result.put(DEFAULT_ALIAS, tokens.nextToken());
return result;
}
// 如果有多个session,则建立别名和sessionId的映射
while (tokens.hasMoreTokens()) {
String alias = tokens.nextToken();
if (!tokens.hasMoreTokens()) {
break;
}
String id = tokens.nextToken();
result.put(alias, id);
}
return result;
}
public List<String> readCookieValues(HttpServletRequest request) {
// 获取request的cookie
Cookie[] cookies = request.getCookies();
List<String> matchingCookieValues = new ArrayList<String>();
if (cookies != null) {
for (Cookie cookie : cookies) {
// 如果是以SESSION开头,则表示是SessionId,毕竟cookie不只有sessionId,还有可能存储其他内容
if (this.cookieName.equals(cookie.getName())) {
// 决策是否需要base64 decode
String sessionId = this.useBase64Encoding
? base64Decode(cookie.getValue()) : cookie.getValue();
if (sessionId == null) {
continue;
}
if (this.jvmRoute != null && sessionId.endsWith(this.jvmRoute)) {
sessionId = sessionId.substring(0,
sessionId.length() - this.jvmRoute.length());
}
// 存入list中
matchingCookieValues.add(sessionId);
}
}
}
return matchingCookieValues;
}
再来看下获取当前request对应的Session的别名方法getCurrentSessionAlias1
2
3
4
5
6
7
8
9
10
11
12
13
14
15public String getCurrentSessionAlias(HttpServletRequest request) {
// 如果session参数为空,则返回默认session别名
if (this.sessionParam == null) {
return DEFAULT_ALIAS;
}
// 从request中获取session别名,如果为空则返回默认别名
String u = request.getParameter(this.sessionParam);
if (u == null) {
return DEFAULT_ALIAS;
}
if (!ALIAS_PATTERN.matcher(u).matches()) {
return DEFAULT_ALIAS;
}
return u;
}
spring-session为了支持多session,才弄出多个session别名。当时一般应用场景都是一个session,都是默认的session别名0。
上述获取sessionId和别名映射关系中,也是默认别名0。这里返回别名0,所以返回当前请求对应的sessionId。
onNewSession方法
1 | public void onNewSession(Session session, HttpServletRequest request, |
sessionIdsWritten主要是用来记录已经写入Cookie的SessionId,防止SessionId重复写入Cookie中。
onInvalidateSession方法
1 | public void onInvalidateSession(HttpServletRequest request, |
继续看下具体的写入writeCookieValue原理:1
2
3
4
5
6
7
8
9
10
11
12
13
14
15
16
17
18
19
20
21
22
23
24
25
26
27
28
29
30
31public void writeCookieValue(CookieValue cookieValue) {
// 获取request/respose和cookie值
HttpServletRequest request = cookieValue.getRequest();
HttpServletResponse response = cookieValue.getResponse();
String requestedCookieValue = cookieValue.getCookieValue();
String actualCookieValue = this.jvmRoute == null ? requestedCookieValue
: requestedCookieValue + this.jvmRoute;
// 构造servlet规范中的Cookie对象,注意这里cookieName为:SESSION,表示为Session,
// 上述的从Cookie中读取SessionId,也是使用该cookieName
Cookie sessionCookie = new Cookie(this.cookieName, this.useBase64Encoding
? base64Encode(actualCookieValue) : actualCookieValue);
// 设置cookie的属性:secure、path、domain、httpOnly
sessionCookie.setSecure(isSecureCookie(request));
sessionCookie.setPath(getCookiePath(request));
String domainName = getDomainName(request);
if (domainName != null) {
sessionCookie.setDomain(domainName);
}
if (this.useHttpOnlyCookie) {
sessionCookie.setHttpOnly(true);
}
// 如果cookie值为空,则失效
if ("".equals(requestedCookieValue)) {
sessionCookie.setMaxAge(0);
}
else {
sessionCookie.setMaxAge(this.cookieMaxAge);
}
// 写入cookie到response中
response.addCookie(sessionCookie);
}
至此,CookieHttpSessionStrategy介绍结束。
由于篇幅过长,关于spring-session event和RedisOperationSessionRepository清理session并且产生过期事件的部分后续文章介绍。
总结
spring-session提供集群环境下HttpSession的透明集成。spring-session的优势在于开箱即用,具有较强的设计模式。且支持多种持久化方式,其中RedisSession较为成熟,与spring-data-redis整合,可谓威力无穷。